Tackling ML model deployment with Plumber
• • ☕️ 4 minute read
As mentioned in my previous article, the R ecosystem is growing very fast. Having such a large range of packages we can work with, combined with the latests devops facilities such as Docker, raises the possibility of running easy to develop & scalable machine learning services in the cloud. There is a missing link however, that is, how to interact with our developed programs. It is clear Representational State Transfer (or REST in short) is preferred. This is where plumber comes to the rescue. Very similar to Flask in Python, we can design API controllers through a decorator syntax. In this article, I will construct and deploy such a model with Plumber and Docker, so let’s start with the basics:
Developing the model
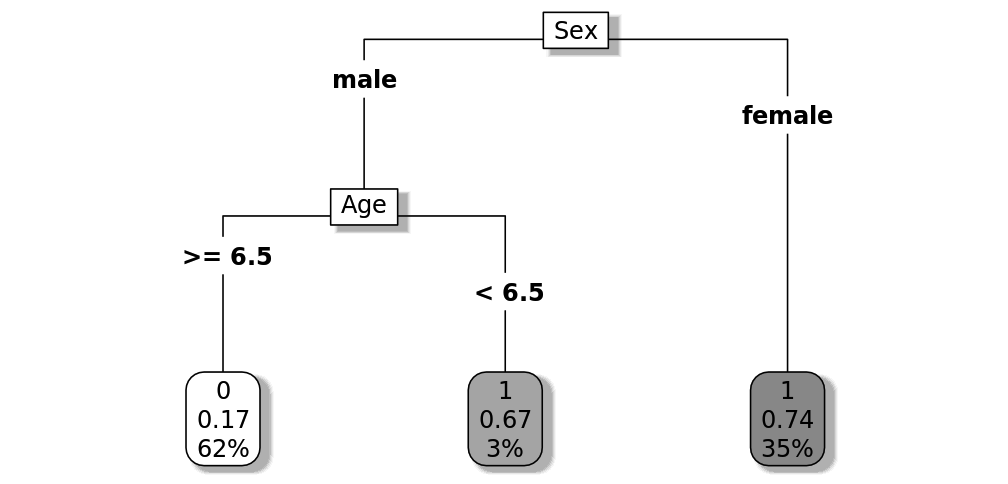
First we will make a decision tree model which predicts the probability of Titanic survivors in function of passenger age and sex. The cp parameter indicates the complexity of the model, the smaller we choose it, the larger/more complex our tree becomes, in this case we just want a small tree so we set it to 0.01 . Once trained, we save the model as an RDS file so we can reuse it for predictions later. Next we plot the resulting decision tree so that we can later verify our API responses.
library(rpart.plot)
library(rpart)

url <- "http://s3.amazonaws.com/assets.datacamp.com/course/Kaggle/train.csv"

# import the training dataset
ds <- read.csv(url)

# define the decision tree
model <- rpart(Survived ~ Sex + Age, data = ds, method = "class", cp=.01)

# save our model
saveRDS(model, file="titanic.rds")

# plot the decision tree
rpart.plot(model, shadow.col="gray", box.palette="Grays", type=5)

Designing our API
We now have to construct all our RESTful controllers which take as input data from the client, apply a function on them and return the result. In order to make sure our HTTP POST requests arrive we include a logger which prints the incoming requests. First, we import the saved prediction model from our earlier work. Next we construct our getPrediction method which takes age and sex as input parameters, combines these into a dataframe and applies the model. This is a simple but important ETL step whereby types should be mapped correctly. The result of our prediction is returned as JSON (by the use of a serializer).
The main reason of having saved the model earlier is to avoid model construction/training for each request. We could also extend our API so that we can post training data in order to re-train/update the model. We can even extend it so that we can return images from generated plots! More info can be found on the official website: https://www.rplumber.io/docs/rendering-and-output.html .
library(jsonlite)
model <- readRDS("titanic.rds")

#* @filter logger
function(req){
  cat(as.character(Sys.time()), "-",
    req$REQUEST_METHOD, req$PATH_INFO, "-",
    req$HTTP_USER_AGENT, "@", req$REMOTE_ADDR, "\n")
  plumber::forward()
}

#* @post /predict
#* @serializer unboxedJSON
getPrediction <- function(age, sex) {

  # typemapping: input ➞ number
  age <- as.numeric(age)

  # create the prediction data frame
  data <- data.frame(Age = age, Sex = sex)

  # apply the model to the data
  prediction <- predict(model, data)

  # return the result (survivalProbability is indexed )
  return( list(SurvivalChance = prediction[,2]) )
}
And finally we construct our main script which imports our controllers and spins up the Plumber API on a given port and host.
library(plumber)

r <- plumb("controllers.R")
r$run(port=80, host="0.0.0.0")
Dockerfile
In order to deploy our server we could use DigitalOcean as explained here: https://www.r-bloggers.com/deploying-a-minimal-api-using-plumber-on-digitalocean/ . We could more easily scale our application (as it is stateless) by deploying it in a Docker container. Hence we now have the option to spin up multiple containers serving on separate ports. By setting up an NGINX load balancer we can let them serve under a single endpoint, distributing the load of request traffic. A tutorial on securing and load-balancing the container can be found here: https://qunis.de/how-to-make-a-dockerized-plumber-api-secure-with-ssl-and-basic-authentication/ . The base image is built on Rocker, which is a prepackaged R environment:
FROM rocker/r-ver:3.5.0

RUN apt-get update -qq && apt-get install -y \
  libssl-dev \
  libcurl4-gnutls-dev

RUN R -e "install.packages('plumber')"

COPY / /
EXPOSE 80
ENTRYPOINT ["Rscript", "main.R"]
In the root of our project (where the Dockerfile is located) we now set up our container. Make sure the ports stay correctly mapped when changed in the R script!
- docker build -t plumber-api . ...
- docker run --rm -p 80:80 plumber-api Starting server to listen on port 80.
Testing the API
In a separate shell we can now vim/nano a small JSON file containing the test data conveniently called testData.json:
{ "age": ["11", "58"], "sex": ["female", "male"] }
Next we curl/wget a POST request to our endpoint:
- curl --data @testData.json "http://localhost:80/predict" "SurvivalChance": [0.742, 0.1682]
We should receive back a list of survival probabilities foreach set of parameters given. That’s it! It’s suprisingly easy and very versatile as we can extend this base setup with new functionalities, or apply the same techniques to more advanced models.